Terror at Devils Bay: 2019
This year's game at Cangames 2019 (originally scheduled for 2018) was entitled Terror at Devils Bay using the Doctor Who the Miniatures Game II (DWMG II) rules and based on the Doctor Who TV episode "The Sea Devils."
The Scenario:
It is 1980 shortly
after the Doctor has foiled another of the Master’s nefarious schemes and
returned him to his prison cell at Scarock Castle. To ensure the Master does not escape Earth
the Doctor has taken a vital component from his TARDIS and decided to deposit
it for safekeeping at a nearby military base.
Accordingly the doctor along with Jo Grant, and a UNIT squad under Captain
Yates visit HMS SEASPITE at Kearvaig Bay, a research facility and former
gunnery grange to hide the component.
While visiting the base the Doctor learns from Helene Salinger, the chief
scientific advisor, that her latest deep sea probe was lost
at sea, and that ships have been mysteriously disappearing. The Doctor decides to assist
her with the new probe investigate the
rash of ship disappearances in the area. Meanwhile the Master has escaped, contacted the Sea Devils and persuaded them to attack the base. This will provide him with an opportunity to enter the base disguised as a Naval Captain to look for his hidden TARDIS component.
 |
| Turn 1, Sea Devils advance towards the beach |
The basic scenario in the DWMG II rule book is a two player game and modified by myself to make it an 8 player game. I got much helpful advice and inspiration from Mark who ran this scenario earlier, see his blog here:
http://level2-wardy-la.blogspot.com/2015/06/doctor-who-terror-at-devils-bay.html
Thanks to Mark for his help in answering my many questions regarding terrain, figures, and vehicles.The table was 8' by 5', and we used roughly 6' x 4' of it in a 4 hour
time slot. I am happy to say it was filled to capacity with 8 players.
Unfortunately I did not have my "official photographer" with me this
year which meant I only had time to take a few quick pictures as I was busy running the game (sorry if a few are a bit bury). This meant I missed
out photographing some of the key scenes, but thankfully one of my players (Terry) contributed 4
pictures, and I have staged some others to fill in gaps.
The Base: HMS Seaspite consists of about 13 buildings including a 3 level brick Admin building that is the HQ and a Hangar. The base is surrounded on
three sides with a Strength 5 barbed wire fence and has three entrances:
the shoreline, main gate and small side gate. The Hospital and the Hangar contain labs
or workshops where things can be invented.
The Third Doctor and Dr. Salinger can also use one of the two mobile technical platforms
(probes) housed in the hangar workshop to modify for inventions.
 |
| Main gate of HMS Seaspite |
 |
Administration (HQ) building to the left, on the right:
Ensign, Hangar pavement with a probe and fork lift |
Rosters:
Heroic Side
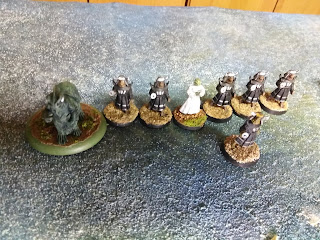
 |
| Third Doctor, Jo Grant and Dr. Helen Slazenger |
 |
Sergent Benton's squad of 5 troopers -
Doctor's body guard |
 |
Lt.(N) Baker's RN Duty Watch: P.O. Jenkins, 6 ratings,
1 LMG team, and 1 Bofors 40mm AA gun with crew |
 |
Captain (N) Hart's HQ squad: CPO Robert, 6 ratings, 1 Medic,
1 flame-thrower and a Land Rover with a .50 cal. HMG. |
 |
Captain Yates UNIT Squad:
Sergent Osgood, 7 troopers, 1 medic + Bazooka team |
Evil / Monster Side
 |
The Master: left disguises as Royal Navy Captain,
right in his customary outfit. |
 |
Armoured Sea Devil Elite squad 1:
Leader Sauvix, Myrka, 5 Sea Devils + Scientist.
|
The Sea Deil's armour gives them a save of a 5 or 6, and the scientists can act as medics to restore wounds, even from downed figures.
 |
Armoured Sea Devil Elite squad 2:
Leader Fiskar, Myrka, 5 Sea Devils + Scientist.
|
 |
Armoured Sea Devil Elite squad 3:
Leader Liskar, 7 Sea Devils + Scientist
|
 |
Unarmoured Sea Devil squad 4:
Leader, 9 Sea Devils and a Medic (green skin).
|
Objectives:
There are three Deep sea probes that are being worked on:
 |
| Mobile Probe 1 |
 |
| Mobile Probe 2 |
 |
| Deep sea probe 3, in original package |
Other important objectives include the: Radar building, 40mm Bofors AA gun, the motor launch, the .50 caliber HMG on the RN Land Rover, and of course the Master's TARDIS component.
 |
| Master's TARDIS component |
Deployment:
The Royal Navy (RN) and UNIT
The base defenders are not expecting an attack so only the duty watch is active on turn 1 until such time as they spot the intruders, at which point the alarm will be sounded and all the defenders can activate / leave the buildings they are in. The Duty watch under Lieutenant(Lt. (N) Baker will deploy around the perimeter, plus crew the 40mm Bofors AA gun and set up their Bren LMG to cover the beach. Captain Hart's HQ group will be in the Admin building, the Doctor, Jo and Doctor Salinger are working on the probe in the Hangar with Sargent (Sgt.) Benton's men nearby to protect them and finally the UNIT squad under Captain Yates will deployed in the large barracks. Once the enemy is spotted and the alarm sounded they can move where they like.
 |
| Bren LMG team |
 |
| LMG Position in Observation Post |
The UNIT Duty watch is spread thin, the defenders chose to deploy only one guard at the main gate and just one at the Jetty security hut, the 40mm Bofors is on the Observation post with the LMG positioned below, PO Jenkins is on a rooftop to observe the beach area, Lt. Baker is in the Armoury with the flamethrower and 2 of the ratings.
Sea Devils:
Start 8" in from the edge of the board in the water and must be spotted.
The Master:
Starts anywhere he likes on the Naval base, but he may not being in a building. He is disguised as a Naval Captain, he can spend a full turn (2 move actions) searching any building and on a roll of 5+ he will finds his TARDIS component, otherwise he needs to move on to another building to search again. By the time he reaches the sixth building if he has not already found the component he will find it in that building automatically when he searches it.
The Game: Turn 1:
In the early dawn the Sea Devils
stealthily wade in from the Ocean while most of the RN and UNIT troops were
asleep in their quarters.
 |
| Sea Devil player's finishing their first move |
 |
| Armoured Sea Devils Advance to shore |
 |
| Sea Devils Advance on the Hangar |
Petty Officer (P.O) Jenkins from the Duty Watch spots the Sea Devils early during the turn and raises the alarm.
 |
| P.O. Jenkins: "WTF...Sound the alarm!" |
The morning calm is shattered by the scream of loud sirens.
https://youtu.be/k2a30--j37Q
 |
| Alarm sounds from the HQ roof |
 |
| Alarm sounds near the UNIT Barracks and Hangar |
The unarmoured Sea Devils realize the Quonset hut is unoccupied and will provide excellent cover.
 |
A squad of Sea Devils arrives safely
on the beach and advances |
The Radar station saw some of the heaviest fighting.
 |
Armoured Sea Devils and a Myrka
attack the Radar Station |
Meanwhile at the main gate the Master succeeds in hypnotizing the RN rating at the gate house.
 |
| "I am the Master you will obey me" |
|
|
|
UNIT forces under Sargent Benton assigned to protect the Doctor set up in defensive positions around the Hangar where the Doctor is working on turning one of the sea probes into a weapon to stop the Sea Devils.
 |
UNIT position in the Hangar landing area,
sea Devils advancing in the background.. |
Turn 2
The RN sailors in the Admin building open fire on the Sea Devils
 |
| Admin building with roof section removed |
The Bofors 40mm AA gun atop the observation building is one of the RNs key defensive weapons it missed on turn 1 but later it helps kill one of the Myrka. The Bren LMG stationed on the lower level of the observation post soon comes under attack by the surviving Myrka.
 |
The Bofors has killed a Myrka but the second one
is too close to fire at, and one crewman is down. |
The surviving Myrka moves close enough to the Bofors to be below its depression arc of fire before electrocuting the Bren LMG team. The group of armoured sea devils shown on the shore above will soon be too close to shoot at also.
A Brave technician armed with a flame thrower leaves the protection of the Admin building and attempts to blast a Sea Devil near the Radar station, but he misses.
 |
| The Flamethrower misses |
The Flamethrower technician is promptly gunned down by the Sea Devils who capture his weapon and examine it.
 |
Sea Devils inspecting the flamethrower
"Hisssss Naughty apes must not play with fire" |
Towards the centre of the beach the Armoured Sea Devils advance off the Jetty into the base, while others start trying to sink the Motor launch with weapons fire. They hate boats!
 |
| Armoured Sea Devils and a Scientist advance |
The UNIT squad under Captain Yates is very cautious and stay in their barracks firing out at the advancing Sea Devils, only the Bazooka team ventures outside. Yates' troops fire has a limited impact on the unarmoured Sea Devils advancing on the Quonset Hut and the Hangar, as their field of fire is limited.
 |
Unarmoured Sea Devils advance on the
Quonset hut under fire from UNIT |
Back at the front gate the Master and his hypnotized guard start searching buildings and luck is on their side as they find the TARDIS component in one of the first building they search, - the Hospital!
 |
Master in a barracks
"I must find my TARDIS component" |
 |
In the Hospital the hypnotized guarnd searches
and find the prize |
Turn 3:
The Sea Devils due to their armour suffered only light casualties in the first two turns, this was magnified by the defenders unfortunate dice rolling as they were unable convert their hits to wounds. However by turn 3 there is close quarter fighting allowing the defenders to use grenades which prove more effective than bullets against the armored Sea Devils.
At the Jetty the Sea Devils manage to sink the RN motor launch (one of their victory conditions).
 |
| Sea Devil Commander "Hisss we hate boats" |
The UNIT squad under Captain Yates continue to say inside its barracks to fight the Sea Devils, taking advantage of the cover. Only a couple of UNIT trooper venture outside to replace a wounded Bazooka crew member. The bazooka eventually destroys a few of the Sea Devils but their are lots more!
 |
| The UNIT squad (some on over watch) in the barracks |
The unarmoured Sea devils capture the undefended Quonset hut and engage the UNIT forces from it, then advance on the Hangar. Nonetheless the Doctor gains a breakthrough in his invention research but he has yet to produce a weapon the defenders can use, more time is needed!
 |
Sea Devil shooting into the hangar,
their leader is wounded. |
The Doctor, Jo and Dr. Helen Slazenger continue to work on a
modification to the ocean probe to help defeat the Sea Devils. One of
the Sea Devils breaks into the Hangar through the door and Jo sees the creature and
screams. One of the SMG armed troops from Sergent Benton's squad stepping forward to defend Jo and the
Doctors and pulls the triger to lets lose a volley of fire on the intruding Sea Devil.
 |
| SMG trooper ready to open fire on the Sea Devil |
CLICK....the UNIT SMG must be out of ammunition, how else can you explain this roll on 4 shots?
 |
| Out of amo - the UNIT trooper yells in frustration. |
Meanwhile near the hospital the Master has found his TARDIS component and starts to make his escape. Nobody seems to notice with all the fighting on the beach.
 |
| The Master: "Open the gate" Guard: "Aye aye, sir" |
Turn 4
Benton's squad fight the Sea Devils near the Hangar to buy the Doctor time to invent a weapon to deal with the aquatic invaders, but his squad is being whittled down. The only available reinforcements are Captain Yates troops in the nearby barracks firing on
the Sea Devils in the Quonset Hut. Benton calls for help .
 |
Benton: "Captain Yates where are you
we need reinforcements at the Hangar" |
Benton gets no response as Yates' troops are content to stay in the barracks shooting at the Sea Devils in the Quonset hut and they soon become isolated.
 |
| Foreground: Captain Yates' troops remain in the barracks |
Without assistance Benton's squad is wiped out, including the Sargent himself who falls victim to a Sea Devils Ray guns.
 |
Benton's squad takes heavy damage
casualties near the Hangar |
 |
| Benton Falls near Bessie. |
Down on the beach the armoured Sea Devils capture the Radar Station (one of their objectives)
 |
The Radar station is captured,
the scientists examines it. |
The second Myrka lumbers up the Observation post stairs and electrocutes the remaining Bofors gun crew man. Another objective achieved, more Ape technology!
 |
| The Myrka silences the 40mm Bofors |
The Duty Watch under Lt. Baker Baker can't hold out much longer in the Armoury.
 |
| The Duty Watch fights to the bitter end. |
Having secured the beach the Sea Devils move inland towards the Admin building and the Land Rover with the HMG flanking it.
 |
Sea Devils capture key Navy positions on the beach,
but lose a Myrka. |
At the Admin building (Stone Frigate HMS Seaspite) the dwindling number of defenders hold on to the last, with Captain Hart, CPO Robert and Able Seaman Bloggins putting down withering fire and throwing grenades.
 |
Captain Hart and his men will go down with ship.
Picture with room and 2 levels removed. |
With the Navy's beach defences crumpling the RN Land Rover armed with a .50 HMG attempts to stop the onslaught and opens fire on the attackers, but the Sea Devils shrugging off the bullets and advance (more untimely poor rolls by the defenders).
 |
| The .50 caliber HMG opens up on the enemy |
Meanwhile the Master makes good his escape with his hypnotized guard dutifully opening the gate.
 |
The Master: "Make sure to close that gate behind me
and don't let anyone else out without my authorization" |
The guard closes the gate, after a dutiful
"Aye aye, sir" and turns away
 |
| The Master smiles in satisfaction having escaped |
Turn 5
Casualties mount for the Sea Devils as one team is wiped out.
 |
| Sea Devil group wiped out near the Radar station. |
However it is worse for the humans. Turn 5 sees the RN Duty Watch eliminated and Captain's Hart's team in the Admin building are close to being wiped out and their .50 cal. HMG armed Land Rover is destroyed by enemy fire.
 |
| Sea Devils destroy the Land Rover with sonic ray guns |
In desperation one of the remaining sailors remove the HMG and attempt to use it against the Sea Devils but he soon falls victim to the Sea Devils ray guns and the HMG is captured.
 |
| "Hiss we shall study this noisy weapon." |
The Duty Watch in the Armoury is next eliminated by the armoured Sea Devils:
 |
| Lt. Baker's Duty Watch is knocked out. |
Captain Hart and CPO Roberts are all the remain of the HQ squad in the Admin Building:
 |
| Capt. Hart and CPO Robert fight on. |
The Doctor has s
uffered
two wounds from The Sea Devil ray disks as he attempts to work on developing a
weapon to counter the amphibious invaders. The UNIT SMG trooper has been knocked out. It will not be long before the Doctor will be captured along with Jo and Dr. Slazenger.
 |
| The SMG trooper is down, the Doctor has 2 wounds. |
The Sea Devils advance further into the base.
 |
| Overhead view of final dispositions |
The victorious Sea Devils advance inland to capture the base and trample over the White Ensign in the process.
 |
| "Hisss. The Ape base is ours, round up the survivors" |
Meanwhile the Master has escaped with his TARDIS component and has no need for his disguise anymore.
 |
"Goodbye Doctor, too bad I won't get to see
what the Sea Devils have in store for you" |
Conclusion:
The game ended at the end of turn 5 with a Sea Devil victory. The Sea Devils had lost one squad and the Master had escaped with the vital TARDIS Part. The Human side had lost two squad, the RN duty watch and Sergent Benton's squad, plus the RN HQ squad was near to being eliminated - only the Captain Yates squad in the barracks was in a state to fight on.
Based on figures knocked out and objective obtained First prize went to one of the Sea Devil players, second to the player running Captain Yates squad in the barracks and 3rd to another Sea Devil player.
All the players enjoyed the game and we came to a
conclusion within the allotted time, although this game was a bit less
of a cliff hanger than previous games as it was pretty obvious the Sea
Devils had won by turn 4.
Prologue
The Victorious Sea Devils took many prisoners including: the Doctor, Jo,
Captain Hart, Under-Secretary Walker (who blundered in at the end) and a
number of naval ratings and a CPO. The remaining Naval and UNIT figures managed
to escape.
 |
| Prisoners |
This game turned out much like the TV
episode where the initial Sea Devil attack captured the base. It sets
up a follow-on game of a human counter-attack to retake the base and
free the prisoners and for the Master to return to try to invent a
device to reawaken more Sea Devils in suspended animation!
Post Game Discussion
There was some post game discussion suggesting the board set up needed to be deeper to allow the RN / UNIT troops to have more time and distance to fire on the advancing Sea Devils. I can see some merit to this idea but I am not sure it would have made a huge difference to the outcome as the defenders rolled very poorly in the first two turns and their most potent weapons proved to be short range grenades not long range fire with bullets. Nonetheless next time the base set up will be deeper. and the Sea Devils will only start 4" in. Another idea was to consider the probes to be a "breakthrough" for the purposes of the invention rule to allow the defenders to have a better chance of inventing a weapon in time. A further scientist wold also be helpful, maybe Liz Shaw.


7 comments:
Cracking good report. Looks like a great deal of fun was had by all.
Fabulous report and a great looking game! Glad to be a small bit of help and really pleased all your work came to fruition and a successful game!
Mark
Thanks Mark. As with the TV episode there may be a human counter-attack!
Great report!
Wow - superb looking set up and the game looked a lot of fun despite the dominance of the Sea Devils! Must get round to making some 70's urban scenery for my Who minis...
Thanks.
Thanks and Yes it was well received.
Post a Comment