I was pleased that some new members at my Games Club the Ottawa Miniatures Gamers (OMG) club have expressed an interest in playing Spearhead, a battalion / regiment level Second World War land battle game, reviving one of my favourite micro scale Second World War rules sets that I had not had a chance to play in over a decade at the club. This game took place on Sunday February 5th, 2023 at OMG, it is set in the Summer of 1944 in Normandy with two reinforced British battalions attacking one German reinforced battalion that is defending a town and a nearby ridge line. The scenario is an introductory scenario since both players had not played for some time and with an AGM a the club meeting interrupting the game we had limited time. The game was played in 6mm, 1/285 scale on a 3' x 4' gaming area, a Warzone Homeland - green grass and earth mouse pad mat.
 |
| Scenario map |
The
map above is based on a 36" wide by 48" deep table where each grid square is 12" in width or 1200 yards. A series
of woods break-up the battlefield and provide cover for both the British forces and the German defenders, whom I was playing.
The scenario called "Battalions Advance" can be found here: https://ww2spearhead.wordpress.com/2012/11/20/battalion-advance/comment-page-1/#comment-292
I had planned this scenario for three players with two players operating the British side and the GM (me) playing the Germans. To quote from the scenario:
"The scenario was the result of a requirement for a Spearhead training exercise to work through the finer points of a battalion level infantry assault on prepared positions. These finer points, it was felt, were sometimes lost in larger games especially for players new to Spearhead.
This scenario can be played solo, as a training mission or with up to three players, with those learning the rules commanding the British as in this way they have more command decisions to make."
Unfortunately one of the British players had to cancel so it quickly turned into a two player game.
The Forces Engaged
German:
German
Infantry Battalion:
• One Infantry Battalion from a 1944 Infantry Division
at full TO&E with regular morale. All stands may be entrenched in light
entrenchments. The battalion has defend orders.
German Divisional Assets:
• Two Stug III SP guns (75mm/L48) which are allocated to
the battalion as support stands, these
stands may not be entrenched but may, for example, be deployed in woods or in
cover on hills.
• A single stand of 150mm artillery from the regimental
gun company off table. Only two fire missions are available. No dedicated FAO,
spotting is by fighting stand.
German forces may be deployed on table up to the line between points "A -
A" marked on the map. German troops may not deploy between this line and
the British entry area. The battalion is given defend orders. Normal command
radius applies except that up to three German infantry in the rear, may be
initially deployed out of normal command range if desired. Any subsequent movement
by this company must be to bring it into command as soon as possible, but can
be at combat speeds.
 |
| German Infantry battalion in 1/285 scale |
British:
British Infantry Brigade:
• Two infantry battalions at full TO&E. No RASC.
Regular morale.British Divisional Assets:
• One heavy weapons company of three HMG stands and one
4.2" mortar stand. These can be attached to one infantry battalion. The
4.2" mortar can be on or off table and has five fire missions. It does not have a dedicated
on table FAO.
• One armoured squadron equipped with three Sherman
stands and one Sherman Firefly stand. These can be attached to one infantry
battalion.
• Two 25pdr batteries each of two 25pdrs off table. Each
battery has ten fire missions. One battery to be attached to each battalion
each with a FAO. The FAO can request fire from one or both batteries. British
troops enter on the indicated board edge. No troops may flank march but one
battalion may be held in reserve off table. If held in reserve its entry point
must be marked prior to the start of the game. Any, or all fire, missions may
be pre-planned if desired.
Special Rules:
• British command arrows and allocation of support
weapons are completed first. Then all German troops are placed on table, except
that two German stands may be deployed in hidden positions. These stands are
then only placed on table if they move, fire or are spotted.
• The fields block visibility to troops at the same
level. Treat all movement within fields as broken ground. The fields do not
however provide protective cover.
• The British FAOs can request fire from either or both
25pdr batteries each turn.
• Counter battery rules are not to be used.
• The game lasts a maximum of 16 turns.
Set-up
Unfortunately I did not get a full overhead view of the battlefield, but below is a picture of the centre right of the battlefield including the town, bridge on the right flank, large central two tier hill, and a removable canopy style woods in dark green that I built as a pro type to try out in this game (see picture below).
 |
| Overview showing town and both bridges |
 |
| Close up of woods with removable canopy |
Victory Conditions
To claim victory the British player must secure a number of features.
They may claim a minor victory if they capture and holds three, of the four, two contour hills that dominate the town and surrounding area. They must achieve this without suffering more than 12 stands of casualties.To claim a major victory they must capture and hold the town as well as hold three, of the four, two contour hills that dominate the town and surrounding area. They must achieve this without suffering more than 18 stands of casualties. If the British player fails to achieve the above victory conditions the German player may claim victory.
German Deployment
I decided to deploy the first German infantry company on the left flank hill, the second in the woods near the bridge on the right flank and the third company in the town, with the Stug IIIFs, MG42 (HMG) and BHQ on the central hill.
Unfortunately I missed taking some of the key event pictures as I was busy playing and refreshing my memory looking up rules but most of the key events are shown below..
The Battle
The British Commander decided to deploy both infantry battalions (tan and orange), one advancing on the right flank the other on the left, with the FOs in advance and the 4.2" mortar on the board.
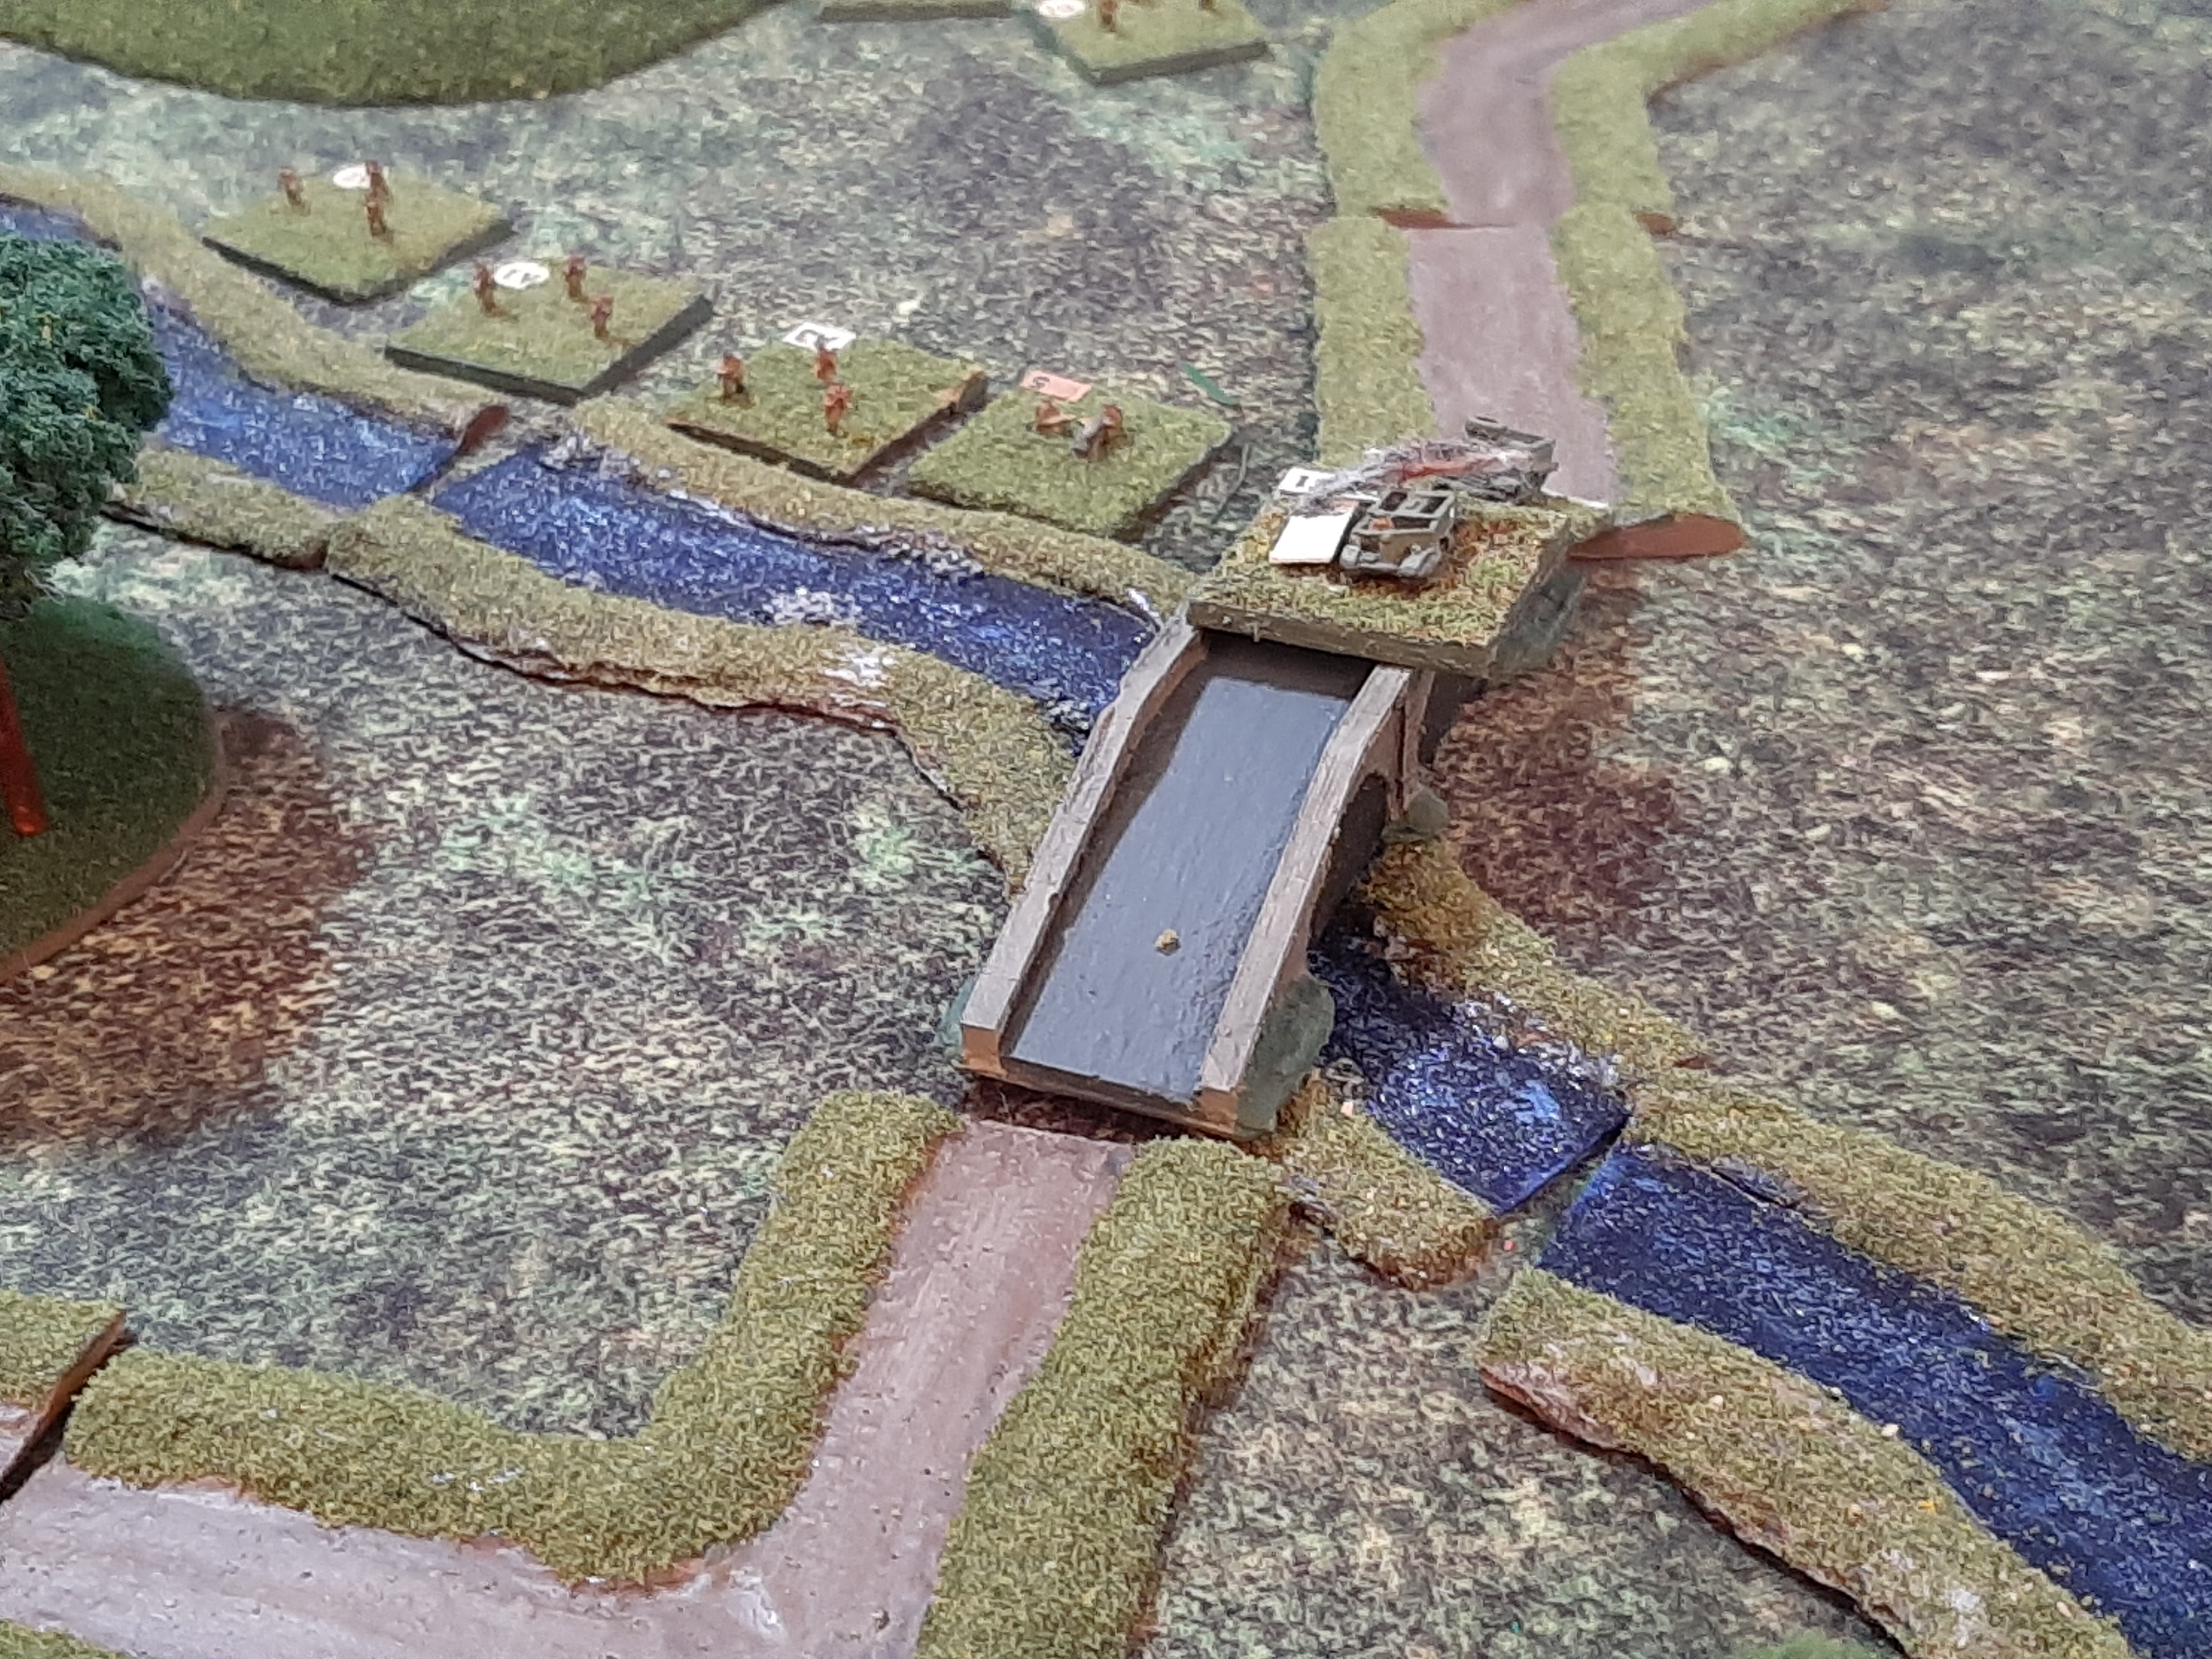 |
| British Recon carrier destroyed on the right flank bridge |
The British tan battalion advanced over the bridge on the right flank but the lead carrier was hit by a German MG42 (HMG) and was knocked out on the bridge blocking it. Meanwhile the British orange battalion advanced on the left flank, but their lead recon carrier was soon destroyed by fire from the German Stug IIIFs on the central hill as it approached the main hill on the left flank. The attached support battalion (brown) sheltered in a nearby woods.
 |
| British Orange battalion advances |
 |
| German Stug IIIFs and MG42 in foreground |
The British player brought forward an engineer M5 carrier to clear the Universal Recon carrier off the bridge, but this delayed the advance.
 |
| Carrier being pushed of the bridge by a half-track |
The British player managed to win the initiative roll on each turn, but their 25pdrs did not do a lot of damage to the dug in German infantry. While the German Stug IIIFs did some damage, including destroying a British Recon carrier, they were soon engaged by the British Squadron of 4 British Shermans that destroyed the Stug IIIFs in short order. The Stugs were handicapped by hot gaining hull down status and having to move to face fire on the Shermans to their left, and under the rules they can't fire in the same turn that they move.
 |
| Burning German Stug IIIFs on the hill |
 |
| British Sherman's in support of the Orange Infantry battalion |
The British Orange battalion and its supporting Shermans engaged in a short range fire fight with the German company dug in on the left flank hill, and took heavy casualties while the German infantry proved very resilient (green disk = suppressed)
 |
| Battle on the left flank hill |
 |
| Battle on the left flank hill |
Eventually the British attempted to close assault the German company on the left flank hill but at this point all of the German platoons (bases) that had been suppressed by 25pdr fire had recovered. Meanwhile the German's called in fire from their single 15cm SIG gun but it had no major impact.
 |
| The Germans are surround on the left flank but fight on. |
Meanwhile the delayed British advance over the bridge on the right flank gets moving again and occupies the woods on the German side destroying the German infantry company hiding in it.
 |
| German infantry in the right flank woods under attack |
After the British tan battalion captured the woods on the right flank near the ridge they ended up in a long fire fight with the German MG42, then come under fire from the third German infantry platoon in the town.
The battle on the left flank continued with the Germans losing an infantry platoon to a British armoured overrun attack but the British lose an entire orange infantry company and their orange BHQ. Another British orange company advances over the hill and captures the hill beyond it on the far left flank.
 |
| Battle on left flank hill, Shermans attacking 2 German platoons |
The British armour proved to be more effective than their infantry in the battle for the left flank hill, but they become subject to German Panzerfaust fire as they advance into combat.
 |
| Battle for left flank hill, British HMG and engineers on right |
Meanwhile in the battle near the town the British Tan battalion succeeds in capturing most of the central hill where the Stug IIIFs were destroyed but the MG42 holds on along with the Battalion HQ.
 |
| Suppressed German infantry on left flank hill eliminated by 3 attacking Shermans |
The British Orange battalion manages to kill two of the three German platoons on the left flank hill but lost a Sherman to Panzerfaust fire and that combined with their earlier heavy infantry losses results in the orange battalion having to take a morale test that they failed, causing the battalion to break and effectively ending the game.
Final Results and post game play.
The Germans lost 5 infantry platoons and 2 Stug IIIFs (7 of their 16 stands), while the British lost an entire Battalion (28 stands) plus around 7 to 9 stands from the tan battalion. Once the British lost the Orange Battalion they could not win the game so the game was technically over. However we fought another two or three turns after that just to see what would happen and while the British were able to capture 3 hills they were not able to capture the town, and the third hill on the left held out for a long time, despite the lone surviving German platoon being out of command at the end of the game before it was destroyed. The German MG42 was also taken out by a close assault after inflicting much damage. The German BHQ then retreated off the central hill to the town leaving the lone German infantry platoon on the left flank out of commend. This would have triggered a German morale test but at this point it was time to pack up and the game had officially ended with the destruction of the British orange infantry battalion.
Conclusion
Even
though we had a late start we finished, it was a good quick scenario,
that was enjoyed by both players. We made a few minor rule errors as it had been many years since we last played but nothing major. At first it seemed the British would
overwhelm the Germans but the latter were hard to kill when dug in. The
British were also delayed when a German MG took out a Bren carrier on
one of the two key bridges blocking it until and engineer half-track
could be brought up to clear it. In the end one of the British
battalions took 50% casualties and failed its morale roll which ended
the game. The Germans had lost 7 of their 16 stands at that point.I think the British needed to concentrate their fire more to suppress German targets and close assault them sooner rather than engage in fire fights as the dug in German infantry was easier to kill by close assault. While the German's won, ti was very close and it was likely a mistake to deploy the Stug IIIFs on the hill since they are not eligible to get hull down.
Nearby 15mm Spearhead Game
The same scenario in 15mmwas being played by two other players new to the game with basic terrain on a nearby table with slightly different equipment for the Germans who had 75mm Pak40 AT guns.
 |
| Well painted Shermans lead the British advance |
In this 15mm battle the
British managed to win fairly easily mostly because the German player
was new and deployed poorly. The British player had a hard time getting the
Germans out of their entrenchments but with enough firepower it
happened. The British ended up not using much of the 25pdr missions as their units
kept moving. In doing so they managed to take two of the hills before the
Germans failed their morale test and game was over. The British lost two carrier
platoons, two Sherman’s, and an infantry stand. The Germans lost 5 or 6
infantry stands and 2 Stugs. Overall I was told both players had a very enjoyable time and plan to play more Spearhead games.
 |
| Stugs German infantry and 75mm Pak 40 near centre |
Some final Thoughts:
I look forward to seeing more Spearhead games at OMG either in 6mm or 15mm or both and running more at my place as well. I will likely run this scenario again for the player who could not make it (and/ or anyone else who is interested), and run some of the larger scenarios produced by the same source, such as this one called Pushing Forward set in Normandy in 1944: https://ww2spearhead.wordpress.com/2013/01/22/pushing-forward-normandy-1944/comment-page-1/#comment-291
Main webpage for scenarios: https://ww2spearhead.wordpress.com/scenarios/
Other suggestions for future Spearhead games have included a North Africa desert battle in 6mm or 15mm, a 1943-45 Eastern front game in the same scales, and a Great War Spearhead game (likely set in 1916-18 in 15mm or 20mm scale). I also want to play a France 1940 game with Spearhead.
No comments:
Post a Comment